Turning a Jekyll site into a Progressive Web App
Intro
So I wanted to see if I could make this blog more like a Progressive Web App (PWA). Since it is built with Jekyll, it’s a prime candidate for the service worker and the cache storage API.
I won’t recap exactly what a PWA is, as there are other articles describing this in detail (start here if you’re curious).
What I’ll be doing:
- Create the necessary files required
- Web App Manifest
- Service Worker
- JavaScript to register the service worker
- Including the files in the final build output
- Referring to the created files in Liquid templates
- Showing how to set up Continous Delivery of the Jekyll site
Creating your Web App Manifest
A PWA requires a manifest file that holds configuration for the site. I recommend just heading over to https://app-manifest.firebaseapp.com and create it from there. The end result will look something like this:
{
  "name": "Fredrick Biering",
  "short_name": "FredrickB",
  "theme_color": "#000000",
  "background_color": "#ffffff",
  "display": "standalone",
  "orientation": "portrait",
  "Scope": "/",
  "start_url": "/",
  "icons": [],
  "splash_pages": null
}
This configuration will not be viable for an install banner since it’s missing references to icons, but that can easily be added later.
Place the manifest file at the root of the project directory. I will assume that the file is named manifest.json. By default Jekyll
will pick it up (if not, check the config and see if it’s being excluding manually). jekyll then copies the manifest to the root
of the _site directory.
Now add a reference to the manifest in _includes/head.html:
<head>
  ...
  <link rel="manifest" href="{{ "/manifest.json" | prepend: site.baseurl | prepend: site.url }}" />
  ...
</head>
Adding service worker registration
Another requirement is a JavaScript file responsible for registering the service worker. I’ll be using a file located at js/main.js
in my root project directory, meaning it will placed in _site/js/main.js.
Add this snippet to the created file:
// Only trigger if service workers are supported in browser.
if ('serviceWorker' in navigator) {
  // Wait until window is loaded before registering.
  window.addEventListener('load', () => {
    // Register the service worker with "/" as it's scope.
    navigator.serviceWorker.register('/sw.js', { scope: '/' })
      // Output success/failure of registration.
      .then(() => console.log('SW registered'))
      .catch(() => console.error('SW registration failed'));
  });
}
This snippet presumes that the service worker is located at the root of the hosted site (_site/sw.js).
Now add a reference to the file in _includes/head.html:
<head>
  ...
  <script type="text/javascript" src="{{ "/js/main.js" | prepend: site.baseurl | prepend: site.url }}"></script>
  ...
</head>
Creating the Workbox configuration
Ensure that jekyll has generated the _site directory before proceeding. If not, then Workbox won’t be able to scan the types of files
to include in selection of precache targets.
Instead of writing the service worker logic by hand, I’ll be using Workbox. Workbox can generate your service workers based on a configuration file (and much more). It removes the need for writing a lot of boilerplate code.
To start off, install the Workbox CLI. Node.js and npm must be installed prior to this.
Install the CLI:
npm install -g workbox-cli
Start the wizard:
workbox wizard
Select the _site directory:
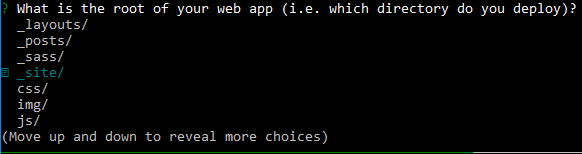
Select which files the service worker should precache:

Save the service worker to _site/sw.js:

Save the workbox configuration file at the root of the project.

A file named workbox-config.js should have been created and look something like this:
module.exports = {
  "globDirectory": "_site/",
  "globPatterns": [
    "**/*.{html,css,xml,png,jpeg,js,json}"
  ],
  "swDest": "_site/sw.js"
};
Generating the service worker
Service worker can now be generated by running: workbox generateSW workbox-config.js from the root of the directory. Output should display the amount of files which will be precached, and the total bundle size:

The file _site/sw.js is generated. It should look something like this:
...
self.__precacheManifest = [
  {
    "url": "2018/05/14/home-assistant-a-smarthub-done-right/index.html",
    "revision": "5c7598a8833f090652597e80d6c6519c"
  },
...
Note that when jekyll regenerates the _site directory, sw.js is always deleted. It must then be generated again with the previous command.
Test the functionality by navigating to http://localhost:4000 and use developer tools to check manifest/offline functionality/created cache storage. The site
can also be tested by deploying it (assuming it is served over https).
Demo
If set up correctly the offline experience can look something like this, depending on precache strategy (gif is not available offline):
Conclusion
Using Workbox, adding PWA capabilities to jekyll is fairly straightforward. Since the entire site is based on static files, it’s a prime candidate for precaching almost everything for offline usage. However, be careful when it comes to just how much is being cached. The cache has a finite size that differs for each browser vendor implementation.
Some challenges discovered during the setup:
- Disqus comment section does not work while offline, but this is not something considered vital while offline.
- Jekyll deleting
_site/sw.json file changes when runningjekyll serve. This makes it hard checking offline functionality during development.
Tip: Setting up Continous Delivery
Remembering to run all these commands every time is tedious and error-prone. It’s better to create a pipeline to automate it, allowing the author to focus on content creation.
This example uses Gitlab CI, but can be done by any CI-tool which has access to a scripting interface and docker-based steps.
Following is an example of a .gitlab-ci.yml that could automate this process:
stages:
  - build
  - generate_sw
  - deploy

# First build the static _site directory with some
# custom configuration for production.
# Mark the _site directory as an artifact to pass the directory to the "generate_sw" step.
build:
  stage: build
  image: ruby:2.5
  artifacts:
    paths:
      - _site
  before_script:
    - gem install jekyll bundler
  script:
    - bundle exec jekyll build --config _config.yml,_config.prod.yml

# Next step after generating site is to generate the service worker.
# The _site directory from the previous step is downloaded,
# the service worker is generated into the _site directory.
# Mark the updated _site directory as an artifact again to pass it to
# the "deploy" step.
generate_sw:
  stage: generate_sw
  image: node:8-alpine
  artifacts:
    paths:
      - _site
  before_script:
    - npm i -g workbox-cli
  script:
    - workbox generateSW workbox-config.js

# Deployment step will only trigger if current branch is the master branch.
# Mark this step as a the production environment.
# This example uses firebase hosting for deployment, install the CLI from npm and run the
# deploy command.
deploy:
  image: node:8-alpine
  stage: deploy
  only:
    - master
  environment:
    name: production
    url: $PRODUCTION_URL
  before_script:
    - npm install -g firebase-tools
  script:
    - firebase deploy --token $TOKEN
The “deploy” step requires the firebase.json configuration to have it’s public key set to _site:
{
  "hosting": {
    "public": "_site"
  }
}
That’s it! Now, every time the master branch is updated, Gitlab will automatically:
- Build the jekyll site
- Generate a new service worker with precaching based on
workbox-config.js. - Deploy the
_sitedirectory to firebase.